Hi there,
do you have any hints about sensor placement, needed packaging (we can also use a 3D printer), cable placement, etc.? All useful information would be great.
Thanks,
Giuseppe.
Hi there,
do you have any hints about sensor placement, needed packaging (we can also use a 3D printer), cable placement, etc.? All useful information would be great.
Thanks,
Giuseppe.
Hi there,
Giuseppe is asking for some help:
Can you provide any guidelines and pictures from one of our setups, @einsiedlerkrebs, @clemens or @karsten?
With kind regards,
Andreas.
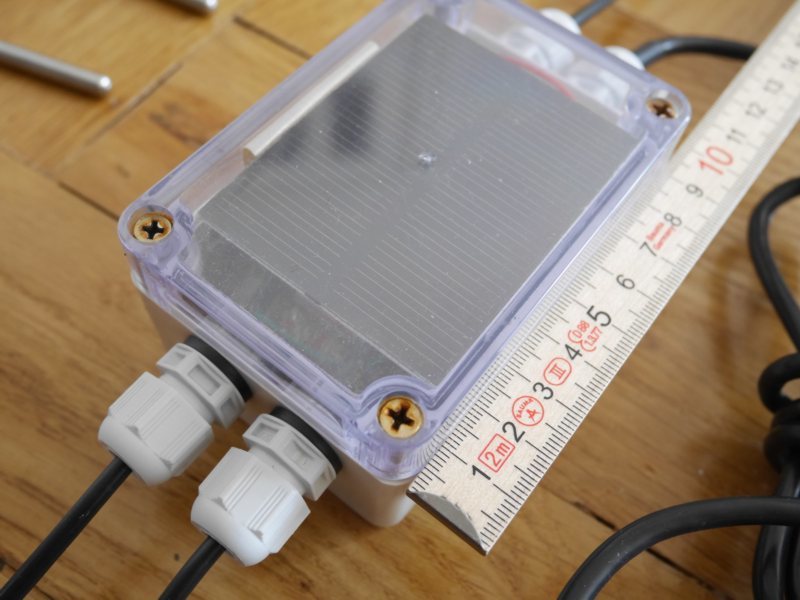
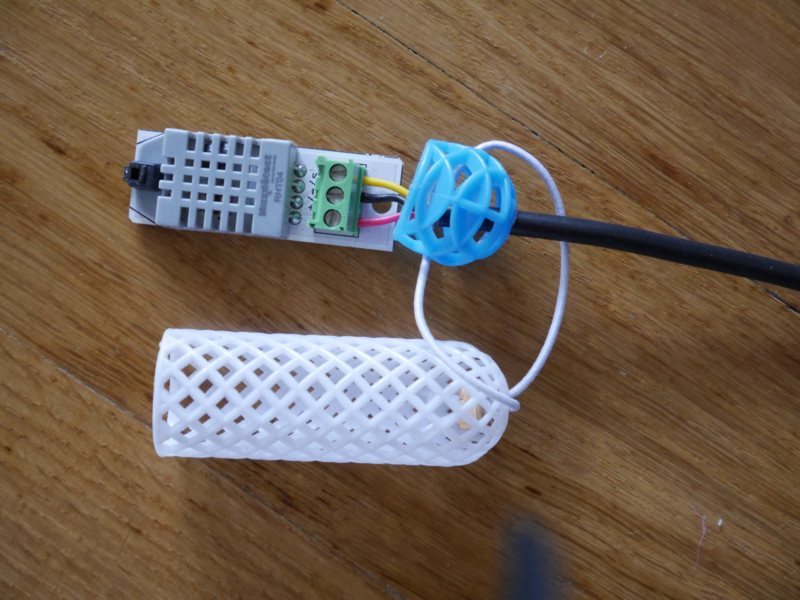
@gtuveri my electronic box has a transparent top for the solar cell in the box.
So this part is out of the hive. Inside the hive I use for protection for the combined humidity / temperature sensor a simple hair roller, you are possibly using and knowing as (male) beekeeper for queen protection and part time cage while inspection.
Hello.
I want to resurrect this topic. I’m currently collecting information how to build my own setup. One open question I have is how to wire everything together in the hive. I have not read much about this topic, but think it is important.
I have seen solutions that place the main box beneath the hive and go through a hole in the bottom-mesh.
Others seem to use a flat cable and enter the hive from one side at the top of the brood hive.
How do you set up your wiring of sensors and scale, what has been proven good practice. What materials do you use?
How many temperature sensors per hive do you use and why? Do I need 9 sensors for a Zander system? would 2x9 Sensors bee better if I use 2 brood hives? Where do you place the Temperature/Humidity sensor.?
Ok. enough questions ;-)
My goal would be to have a flexible solution that allows
First a box on top of the hive, e.g. a empty feeder, seems to be a good place for the electronic. You can always access it without moving boxes or the hive around, it has a nice “working height” and is covered against rain and - in the winter time - a bit heated by the bees. But for me it has too much downsides: You have to remove it on every inspection. Cables must “grow” though the circle of the year. Every new super need more cable length. And, in case you will only measure in the broad box you have to lead all cables through the honey supers. An inspection is not really good doable or you need pluggable and extendable cables.
The problem with the Open Hive Solar variants is that I need a place with sun for the electronic box. Bee hive’s top would be good for collecting sun power but it is not the optimum position in terms of inspection, storm, avoiding long cables. And at least with 2 broad boxes and 3 (Zander) supers cables are too long.
So my favorite place would be near the entrance in case I will measure weight and (broad) temperature. You have a short cable to the load cell. @mhies mentioned that long moving cables (e.g. wind) form the “analog” side to the load cell IC leading to changing values. So the cable should be short, shadowed and not movable by wind or storm. The only downside is that sun could be decrease in comparison to the position on top of the hive.
Drilling holes in the base’s mesh makes inspection or de-mounting difficult. I try to rout all cables that I need inside through the hives entrance. So I need no modification on the base and I can change the base without any modification on the replacement item.
About the numbers of temp sensors: You can have a look at the collected Hobos data, they use one sensor for every comb. I think this is not necessary in case you have no special theories to investigate. I think for brood monitoring and 10 Zander combs 5 or 7 sensors per box are sufficient. So you can monitor the center – this is important to detect broodless stats in the winter and you cover the central bee hive for swarming activities.
There is a scientific paper I can not find atm about humidity in the hive and as far as I remember the conclusion was that bees can not influence the humidity in the outer areas (besides choosing the “right” site ;-) but not active in an existing hive. This may be other in the brood area. So it depends on you questions relating humidity. I would place it outside the center nest in a first try.
The people from our sister project Hiverize already made some good-looking tutorials describing different variants of sensor mounting:
What do you think about it?
Thanks for your answers.
I share most thoughts with @clemens points:
What I do not like that much is going in through the entrance in the bottom board. I was thinking about a thin frame with a hole for the cable, that I can put between the bottom board and the deep super. On the other hand this would make the removal of the device more difficult.
One other topic I was thinking about is the pollution of the hive and the honey with chemicals in the wires and the other parts we put into the hive. Some electronic devices really smell awful and I’d bet there are substances that transpire from the cables into the wax, honey and the bees.
I cannot afford to not harvest my honey so I want to bee very sure nothing migrates into it. Currently all the wiring in the hive really makes me feel uncertain If I really want to do this.
I was wondering if I could do it similar to the sensors in the brewpi setups going from outside through the hive wall into the space between two combs. But this would bring cold steel directly into the winter cluster and drain energy. Or you would have to pull out the sensors for inspection, what could be hard if they were fixed by the bees with Propolis. And I do not want to drill my hives.
What do you think about this (issue)?
Interesting resource https://store.brewpi.com ! :-)
Adafruit has - for beer brewing initially - a “food-grade heat shrink” Food-Grade Heat Shrink - 3/8 diameter 12 long : ID 1020 : $3.95 : Adafruit Industries, Unique & fun DIY electronics and kits so In case you don’t wont to have PVC in the hive directly use this as protection.
HOBOS did not place the sensors with cables in the hive but protected with thermowells similar to yout link @Juergen, but longer, they published an inspection picture a long time ago but I can not find it right now. but you have to drill a lot of holes in the box
see: http://www.hobos.eu/de/lehrer-schueler-eltern/hobos-live/bienenstock-allgemein/wuerzburg.html
and it is not weather proof for outdoor. The nice thing is that you can use e.g. this temperature sensor DS18B20 Wasserdichter Temperatur Sensor Hochwertige Version [KP02029] - 5.90EUR : komputer.de, Arduino Open Source Hardware
Gegenüber der alten Version die mit Schrumpfschlauch an der Edelstahlhüle abgedichtet war ist dieser Sensor vergossen. Neben höherer Dichtigkeit bietet dies auch den Vorteil dass der Sensor in handelsüblichen Tauchhülsen mit 6,5mm Innendurchmesser problemlos eingesetzt werden kann.
I think a solution with thermowells (de: Tauchhülsen) could be to mount the thermowells in the base so you can inspect the hive without moving cables around. But this is only a solution for the lower brood box. So it could be ok for Dadant / Zander 1,5 / DN 1,5 beekeeper or beekeeper with only one Zander / whatever brood box. With two brood boxes it will be not possible, and super monitoring is also not doable.